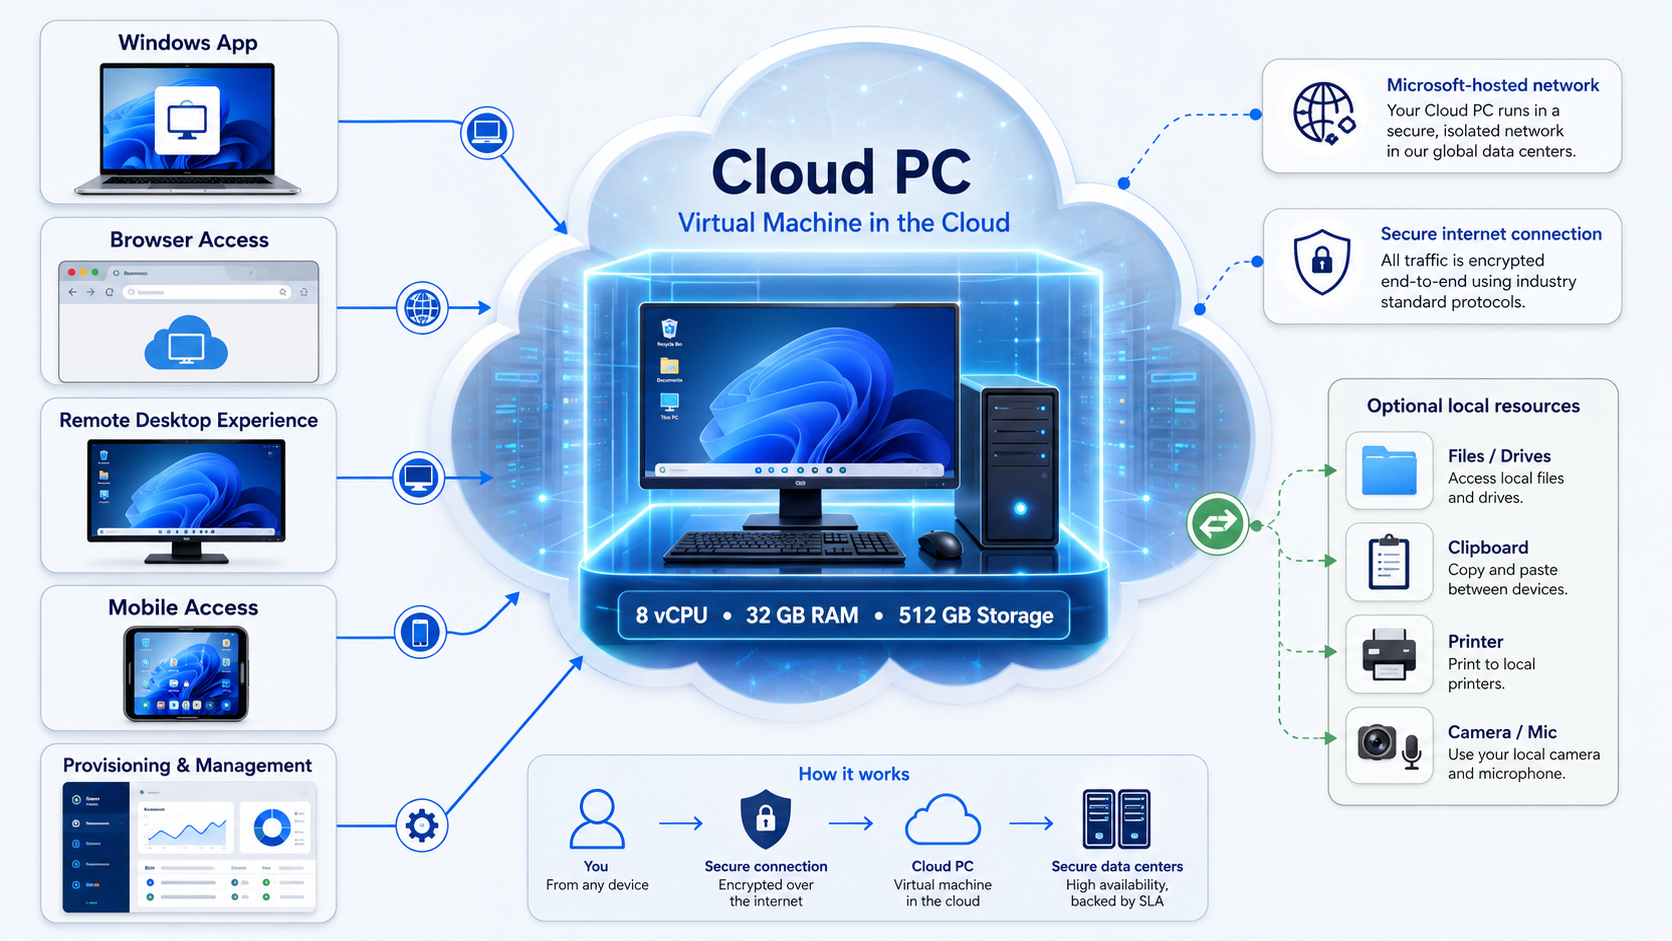
When I bought the Partner Success Core Benefits package, one of the benefits I wanted to use was the included Windows 365 Enterprise Cloud PC:
Windows 365 Enterprise
8 vCPU, 32 GB RAM, 512 GB storage
On paper that sounds simple: redeem the benefit, assign the license, create the Cloud PC, and connect. In practice, I learned that Windows 365 Enterprise has a few moving parts that all need to line up before the Cloud PC appears.
This is the flow I followed, including the licensing and Intune troubleshooting steps that mattered most.
Confirming the Benefit Was Included
I first checked whether the Windows 365 Cloud PC was actually part of my Partner Success Core Benefits package.
In Microsoft Benefits Partner Center, I went to:
Benefits -> Cloud services
There I saw:
Windows 365 Enterprise
Partner Success Core Benefits
1 license
Not Redeemed
That confirmed the license was included, but it was not available yet. The important detail was the status: Not Redeemed.
I also had to separate the Cloud PC subscription from possible extra Azure costs. The included benefit covers the Windows 365 Cloud PC license itself, but extra costs can still happen when using advanced networking, such as Azure VNet integration, VPN, firewalls, or other Azure resources.
For this deployment, I chose the simplest route: Microsoft-hosted network. That avoided unnecessary Azure networking complexity.
Redeeming the Windows 365 Enterprise Benefit
The next step was redeeming the benefit in Partner Center:
Partner Center -> Benefits -> Cloud services -> Windows 365 Enterprise -> Redeem / Activate
Before redeeming it, the license was not assignable in Microsoft 365. After redemption, it became available in:
Microsoft 365 admin center -> Billing -> Licenses
and also under:
Users -> Active users -> selected user -> Licenses and apps
Assigning the Cloud PC License
I then assigned the Windows 365 license to my user:
Microsoft 365 admin center -> Users -> Active users -> Cloud PC User -> Licenses and apps
The license I assigned was:
Windows 365 Enterprise 8 vCPU, 32 GB, 512 GB
That part was correct, but it was not the full story. For Windows 365 Enterprise, assigning only the Cloud PC license is usually not enough.
The user also needs supporting rights for identity, device management, and Windows. In my case, the Partner Success Core Benefits package also included useful supporting products such as:
- Microsoft 365 Business Premium (no Teams)
- Microsoft Entra ID P2
- Defender for Endpoint P2
- Teams Enterprise
- other Microsoft cloud services
The key distinction I had to keep in mind was this:
Office 365 E3 is not the same as Microsoft 365 Business Premium or Microsoft 365 E3.
Office 365 E3 gives productivity services like Office, Exchange, and SharePoint, but it does not automatically cover all Windows 365 Enterprise management requirements, such as Intune.
For my Cloud PC user, the practical recommendation was:
- Windows 365 Enterprise 8 vCPU, 32 GB, 512 GB
- Microsoft 365 Business Premium (no Teams)
- Microsoft Entra ID P2, optional but useful because it was included
Fixing the Intune Access Problem
When I tried to access Intune, I ran into this Dutch error:
Niet gemachtigd
Kan het aantal apparaten per platform niet ophalen. Neem contact op met uw globale of Intune-beheerder.
In English, the meaning was roughly:
Not authorized.
Cannot retrieve the number of devices per platform. Contact your global or Intune administrator.
That told me my account existed and might even have admin permissions, but Intune did not yet authorize it to access Intune data.
At first, I looked at three possible causes:
- My account did not have the right admin role.
- My account did not have a license that included Intune.
- I was signed in with a different account than the one receiving the licenses and roles.
That last point mattered because I was seeing different identities during the setup, including an admin account and Cloud PC User.
I separated the two roles in my head:
| Purpose | Requirement |
|---|---|
| Account managing Intune | Needs Intune access and an admin role |
| Account receiving the Cloud PC | Needs the Windows 365 license and supporting user licenses |
The same account can do both, but if different accounts are used, each account has to be configured for its own purpose.
Checking the Admin Roles
In the Microsoft 365 admin center and Entra admin role screens, I confirmed that my account had:
- Global Administrator
- Intune Administrator
I also added:
- Windows 365 Administrator
Strictly speaking, Global Administrator already gives broad control, but Windows 365 Administrator is the more specific role for managing Cloud PCs.
After that, I checked my Intune permissions again under:
Intune roles -> My permissions
The page confirmed:
U bent een beheerder met volledige machtigingen voor alle Microsoft Intune- en alle Cloud-pc-resources.
That meant I had full permissions for Intune and Cloud PC resources. At that point, the problem was no longer an admin role issue. The next step was to actually create the Windows 365 provisioning policy.
Understanding That a Cloud PC Does Not Start Like a VM
One thing I had to clarify for myself was that a Windows 365 Cloud PC does not start like a normal Azure virtual machine.
There is no simple “start VM” button at the beginning.
Instead, Windows 365 automatically provisions a Cloud PC when both of these are true:
- A user has a valid Windows 365 license.
- That same user is targeted by a Windows 365 provisioning policy in Intune.
So once licensing and permissions were fixed, the real deployment step was the provisioning policy.
Creating a Group for Assignment
Before creating the provisioning policy, I created a Microsoft Entra group:
Microsoft Entra admin center -> Groups -> New group
I used a clear group name:
W365-CloudPC-Users
Then I added the licensed Cloud PC user to that group.
This is a cleaner setup than targeting a single user directly, because Windows 365 provisioning policies are designed to target groups.
Creating the Provisioning Policy
The main deployment step happens in Intune:
Intune admin center -> Devices -> Provision Cloud PCs -> Provisioning policies -> Create policy
For my setup, I used this configuration:
| Setting | Value |
|---|---|
| Experience | Access a full Cloud PC desktop |
| License type | Enterprise |
| Join type | Microsoft Entra join |
| Network | Microsoft-hosted network |
| Region | Closest available region, such as West Europe or North Europe |
| Image | Windows 11 Enterprise + Microsoft 365 Apps |
| Assignment | Group containing the Cloud PC user |
The two most important choices were:
- Microsoft Entra join
- Microsoft-hosted network
That combination gave me the simplest modern deployment. I did not need my own Azure VNet, VPN, domain controller, or Azure Network Connection.
Enabling Microsoft Entra Single Sign-On
During the provisioning policy setup, I also saw this option:
Eenmalige aanmelding van Microsoft Entra gebruiken
In English:
Use Microsoft Entra single sign-on
I enabled it.
With single sign-on enabled, the sign-in experience is smoother. When I open the Cloud PC, I usually do not need to enter separate RDP or Windows credentials again. It uses the Microsoft Entra identity flow.
For this setup, the clean combination was:
| Setting | Choice |
|---|---|
| Join type | Microsoft Entra join |
| Network | Microsoft-hosted network |
| Single sign-on | Enabled |
Waiting for Provisioning
After creating and assigning the provisioning policy, Windows 365 started provisioning the Cloud PC automatically.
I could monitor the status here:
Intune admin center -> Devices -> Windows 365 -> All Cloud PCs
The status can show:
| Status | Meaning |
|---|---|
| Not provisioned | The user has a license, but no provisioning policy applies yet |
| Provisioning | The Cloud PC is being created |
| Provisioned | The Cloud PC is ready to use |
| Failed | Something went wrong and the error details need to be checked |
The goal is simple:
Provisioned
Once that appears, the Cloud PC is ready.
Connecting to the Cloud PC
When provisioning is complete, I connect through the Windows 365 Cloud PC portal.
I sign in with the same user that received the Windows 365 license. From there, the Cloud PC appears as an available desktop.
I can open it directly in the browser or use the Windows App / Remote Desktop client.
My Final Checklist
This is the complete order I followed:
- I bought Partner Success Core Benefits.
- I went to Partner Center -> Benefits -> Cloud services.
- I redeemed Windows 365 Enterprise.
- I redeemed supporting benefits such as Microsoft 365 Business Premium and Entra ID P2.
- I went to Microsoft 365 admin center -> Users -> Active users.
- I assigned the Cloud PC user Windows 365 Enterprise, Microsoft 365 Business Premium, and optionally Entra ID P2.
- I made sure the admin account had Global Administrator, Intune Administrator, and preferably Windows 365 Administrator.
- I confirmed that Intune access worked.
- I created an Entra group such as
W365-CloudPC-Users. - I added the licensed Cloud PC user to that group.
- I went to Intune admin center -> Devices -> Provision Cloud PCs -> Provisioning policies.
- I created a provisioning policy with Enterprise, Microsoft Entra join, Microsoft-hosted network, and Windows 11 Enterprise + Microsoft 365 Apps.
- I assigned the policy to
W365-CloudPC-Users. - I enabled Microsoft Entra single sign-on.
- I waited for the Cloud PC to show as
Provisioned. - I opened the Windows 365 Cloud PC portal and connected.
The Main Lesson
The biggest confusion was that three separate things had to be correct at the same time:
| Area | What must be true |
|---|---|
| Benefit redemption | The Windows 365 benefit must be redeemed in Partner Center |
| Licensing | The user must have Windows 365 and supporting licenses |
| Intune management | The admin must have Intune and Cloud PC permissions |
Once I fixed the Intune access issue and confirmed that I had full permissions for Intune and Cloud PC resources, the rest of the process became much clearer.
The Cloud PC did not need to be manually started. It needed the right license, the right supporting services, and a provisioning policy that targeted the right user.